Glide Pose Viewer Help
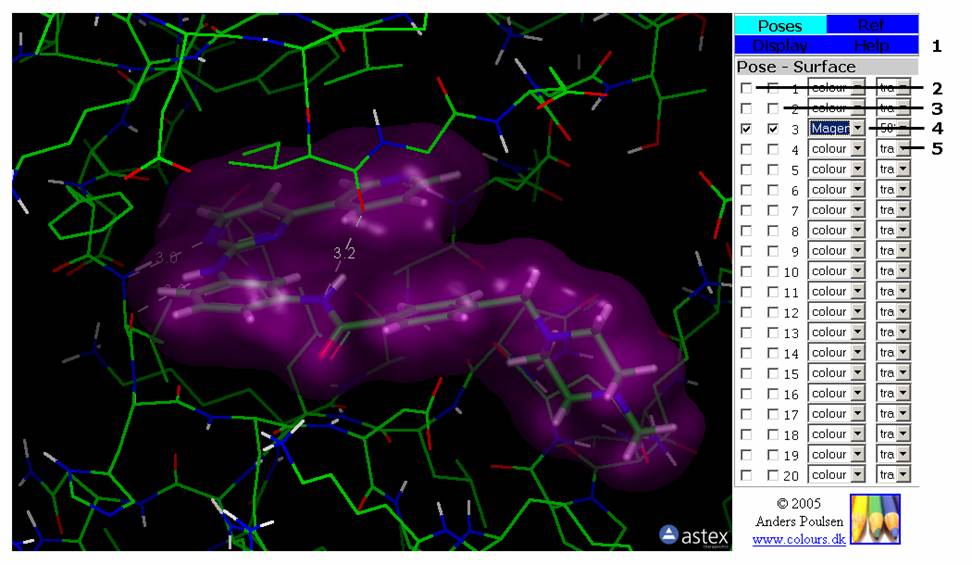
Figure 1: The Poses Tab. This tab contains the controls for the docked ligand poses. You can on/off the display for each pose as well as its surface.
The Poses Tab
Tab Menu
1: Tab Selection menu. The colour of the selected tab is cyan while other tabs are blue.
Pose – Surface Menu
2: First checkbox on each line turns atom display of the pose on/off.
3: Second checkbox on each line turns the surface of each pose on/off.
4: First pull-down menu on each line selects the colour of the pose surface.
5: Second pull-down menu on each line sets the transparency of the pose surface.
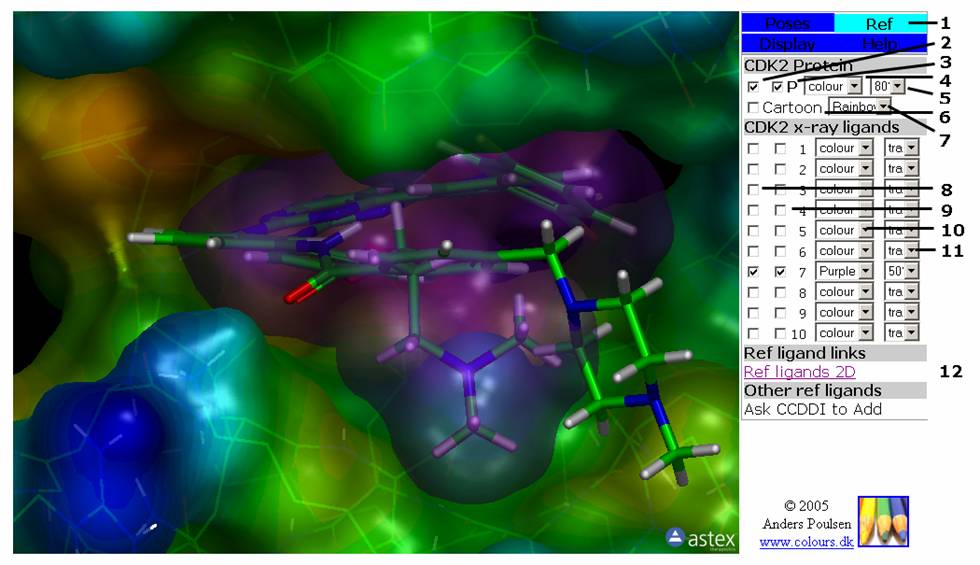
Figure 2: The Ref Tab. This tab contains the controls for the protein(s) and reference ligands. You can on/off the display for reference ligand and protein as well as their surfaces.
The Ref Tab
Tab Menu
1: Tab Selection menu. The colour of the selected tab is cyan while other tabs are blue.
Proteins Menu
2: First checkbox on first line turns atom display of the protein on/off.
3: Second checkbox on first line turns the surface of the protein on/off.
4: First pull-down menu on first line selects the colour of the protein surface.
5: Second pull-down menu on first line sets the transparency of the protein surface. The protein surface can also be displayed as a wire mesh.
6: First checkbox on second line turns cartoon display of the protein on/off.
7: First pull-down menu on second line set the colour of the lipofilicity rendering of the protein surface.
X-ray ligands & Other ref ligands Menu
8: First checkbox on each line turns atom display of the reference ligand on/off.
9: Second checkbox on each line turns the surface of the reference ligand on/off.
10: First pull-down menu on each line selects the colour of the reference ligand surface.
11: Second pull-down menu on each line sets the transparency of the reference ligand surface.
Ref ligand links Menu
12: Link to a page displaying the 2D structures of the reference ligands, inhibition values and literature references
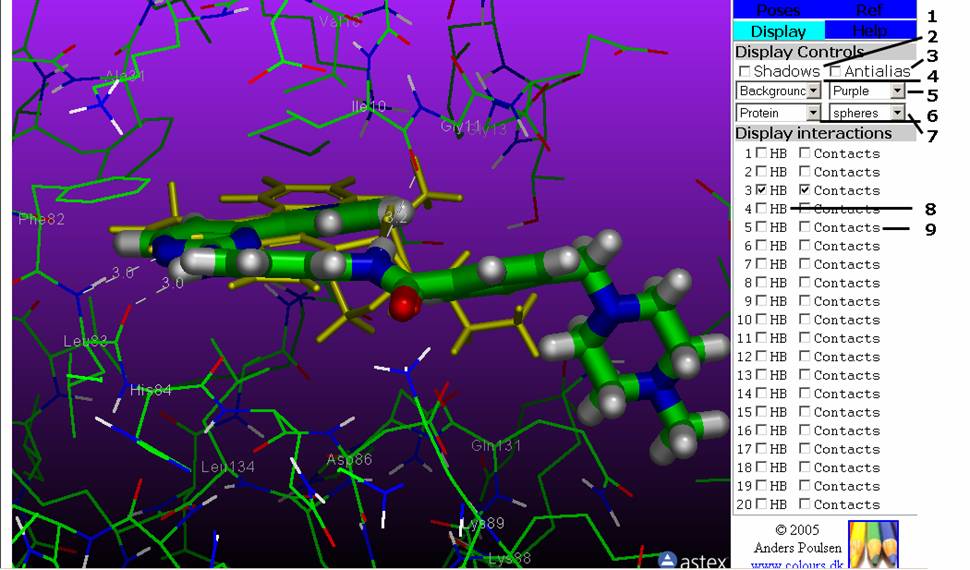
Figure 3: The Display Tab. This tab contains the controls for the viewer display, atom rendering, distance monitors and labels.
The Display Tab
Tab Menu
1: Tab Selection menu. The colour of the selected tab is cyan while other tabs are blue.
Display Controls Menu
2: The checkbox turns Shadows on/off.
3: The checkbox turns Antialiasing on/off.
4: The pull-down menu sets the background colour.
5: The pull-down menu will set a gradient on the background colour. You can choose the top colour, but the bottom colour is black.
6: Changes the atom rendering for the protein(s).
7: Changes the atom rendering for the ligands (poses and reference ligands).
Display Interactions Menu
8: First checkbox on each line turns distance monitors for Hydrogen Bonds between pose and protein on/off. The atom display for the pose (see 1 in the Pose Tab) must be set on.
9: Second checkbox on each line turns labels for pose and protein contacts on/off. Only the CA (alpha) atoms of contact residues are labled.
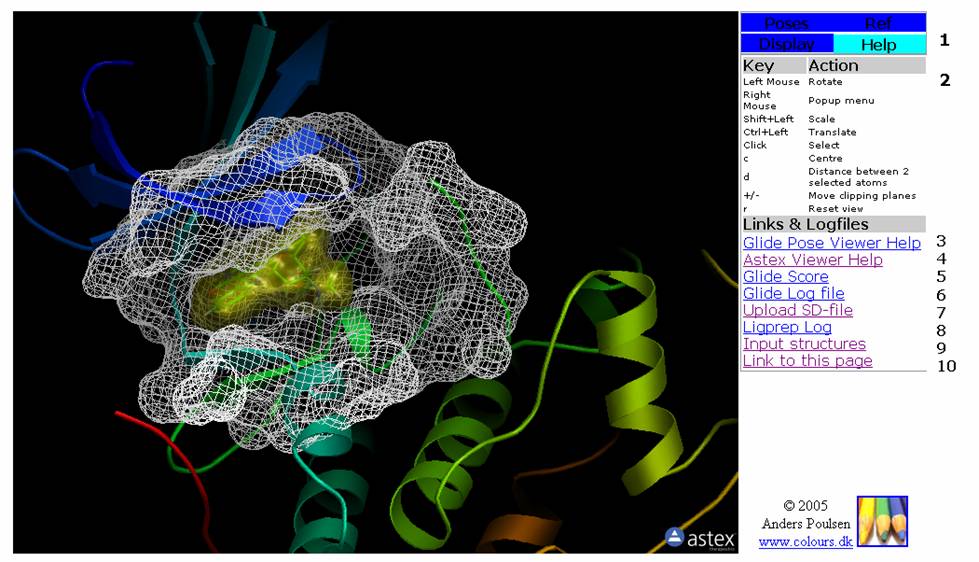
Figure 4: The Help Tab. This tab contains help on mouse and keyboard controls as well as links to help and log files.
The Help Tab
Tab Menu
1: Tab Selection menu. The colour of the selected tab is cyan while other tabs are blue.
Key Action Menu
2: Help on mouse and keyboard controls.
Links & Logfiles Menu
3: Link to Glide Pose Viewer Help.
4: Link to Astex Viewer Help.
5: Ling to the Glide Score file. This file displays the docking score, vdW score, Hydrogen Bond score etc for the docked poses.
6: Link to Glide log file. This is the log file for the docking.
7: Link to an SD-file containing the docked poses.
8: Link to Ligprep log file. This is the log file for the 2D-3D conversion of the docked molecule.
9: Link to the input structure(s). The 3D structure of the molecule(s) to be docked can be inspected on this page.
10: Opens the page without frames (in full view). Copy this link and insert it in Powerpoint etc. for presentation of your docking results.