X-ray Structure Viewer
Help
Before you can use the viewer, you
must load an X-ray structure. See point 1.2 under Display Control &
Help Tab.
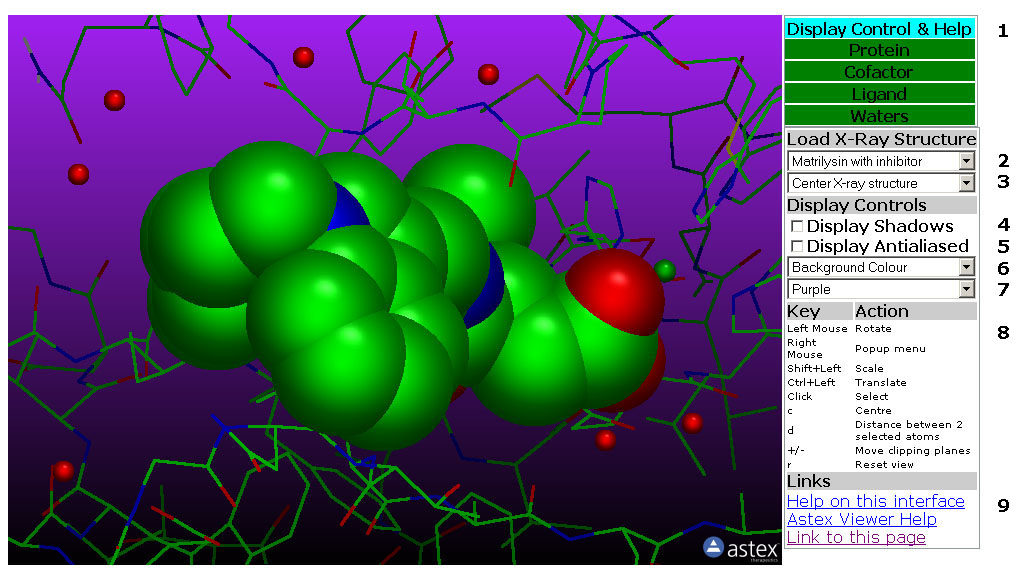
Figure 1: The Display Control
& Help Tab. In this tab uoy can load X-ray structures, change the
Viewer display settings and access Help pages.
1: The Display Control &
Help Tab (Figure 1)
Tab Box
1.1: Select the Control Tab by clicking a Tab in this box. The tabs are
Green except for the active tab which is Cyan.
Load X-ray Structure
1.2: This pull down menu loads one of the available X-ray
structures. Each X-ray structure is divided into 3-4 PDB files:
Protein, Cofactor if present, Ligand and Water. These are all loaded
when the X-ray structure is selected. If a new X-ray structure are
selected, the previously selected are unloaded.
1.3: This pull down menu Centers the X-ray structure on the molecule.
Display Controls
1.4: Toggle shadows on/off.
1.5: Toggle Antialiasing on/off.
1.6: This pull down menu change the background colour of the viewer.
1.7: This pull down menu select a gradient colour. The colour is
applied to the top of the viewer. The bottom is always black.
Key - Action
1.8: Help on Mouse and Keyboard Controls
Links
1.9: Links to Help Pages and the X-ray structure viewer itself.
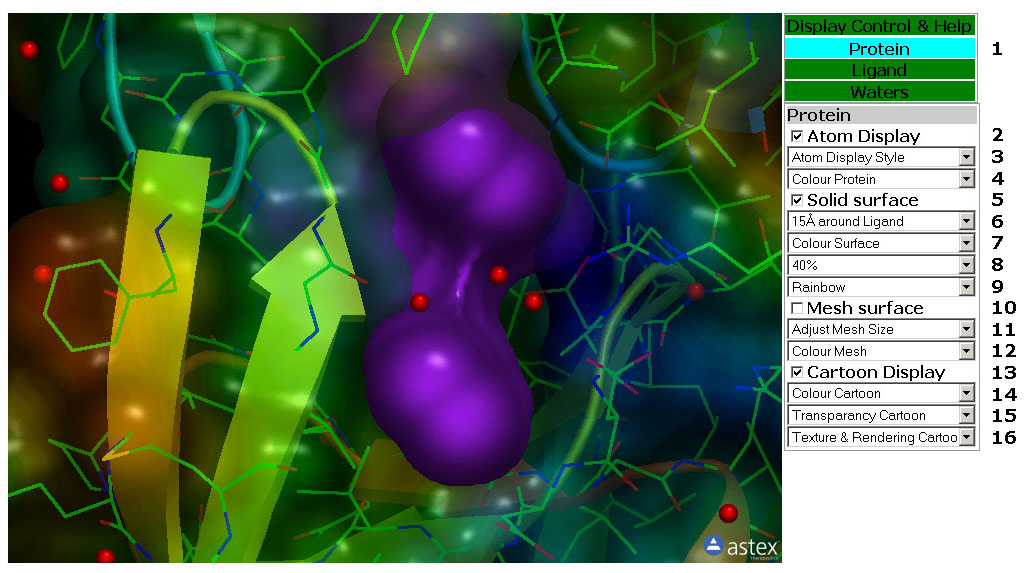
Figure 2: TheProtein Tab. In
this tab you can manipulate the display of the protein structure,
proteine surface and Cartoon rendering.
2: The Protein Tab (Figure 2)
Tab Box
2.1: Select the Control Tab by clicking a Tab in this box. The tabs are
Green except for the active tab which is Cyan.
Atom Display
2.2: Toggle the atom display of the Protein on/off.
2.3: This pull down menu set the Atom Display Style
(Rendering) for the Protein Atoms.
2.4: This pull down menu colour the Protein Atoms.
Solid Surface
2.5: Toggle the Solid Surface of the Protein on/off.
2.6: This pull down menu adjust the size of the Solid Surface of the
Protein.
2.7: This pull down menu colour the Solid Surface of the Protein.
2.8: This pull down menu set the transparancy of the Solid Surface of
the Protein.
2.9: This pull down menu set the texture of the Solid Surface of the
Protein. The surface is coloured according to lipofilicity.
Mesh Surface
2.10: Toggle the Mesh Surface of the Protein on/off.
2.11: This pull down menu adjust the size of the Mesh Surface of the
Protein.
2.12: This pull down menu colour the Mesh Surface of the Protein.
Cartoon Display
2.13: Toggle the Cartoon display of the Protein on/off.
2.14: This pull down menu colour the Protein Cartoon.
2.15: This pull down menu set the transparancy of the Protein Cartoon.
2.16: This pull down menu set the texture and Rendering of the Protein
Cartoon.
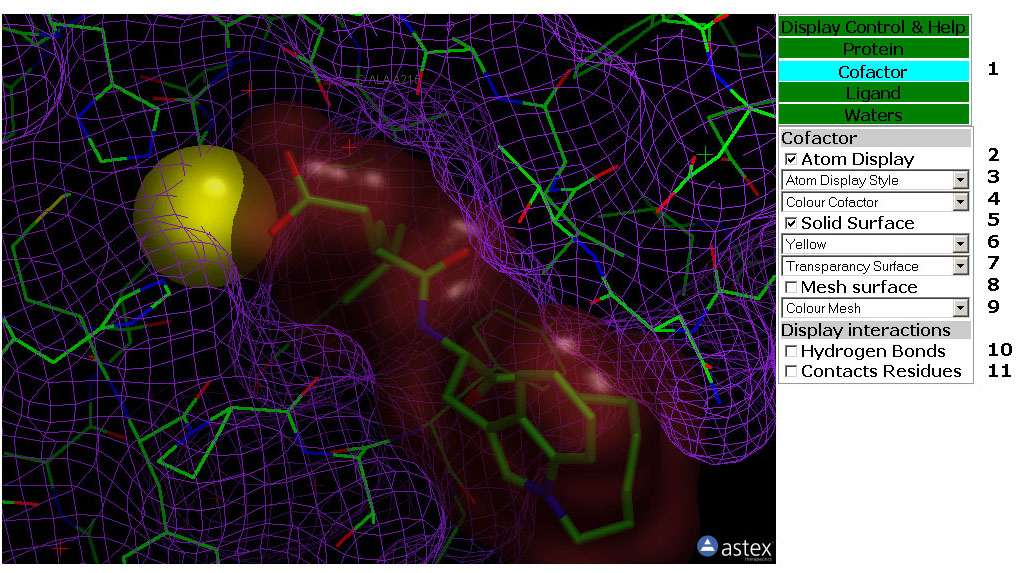
Figure 3: The Cofactor Tab. In
this tab you can manipulate the display of the cofactor, cofactor
surface and Cofactor/Protein interactions.
3: The Cofactor Tab (Figure 3)
Tab Box
3.1: Select the Control Tab by clicking a Tab in this box. The tabs are
Green except for the active tab which is Cyan.
Atom Display
3.2: Toggle the atom display of the Cofactor on/off.
3.3: This pull down menu set the Atom Display Style
(Rendering) for the Cofactor Atoms.
3.4: This pull down menu colour the Cofactor Atoms.
Solid Surface
3.5: Toggle the Solid Surface of the Cofactor on/off.
3.6: This pull down menu colour the Solid Surface of the Cofactor.
3.7: This pull down menu set the transparancy of the Solid Surface of
the Cofactor.
Mesh Surface
3.8: Toggle the Mesh Surface of the Cofactor on/off.
3.9: This pull down menu colour the Mesh Surface of the Cofactor.
Display Interactions
3.10: Toggle Hydrogen Bonds from the Cofactor to Protein, Ligand and
Waters on/off.
3.11: Toggle Lables on Protein residues that makes v.d-W contacts to
the Cofactor on/off. The alpha carbon of the residue are labled.
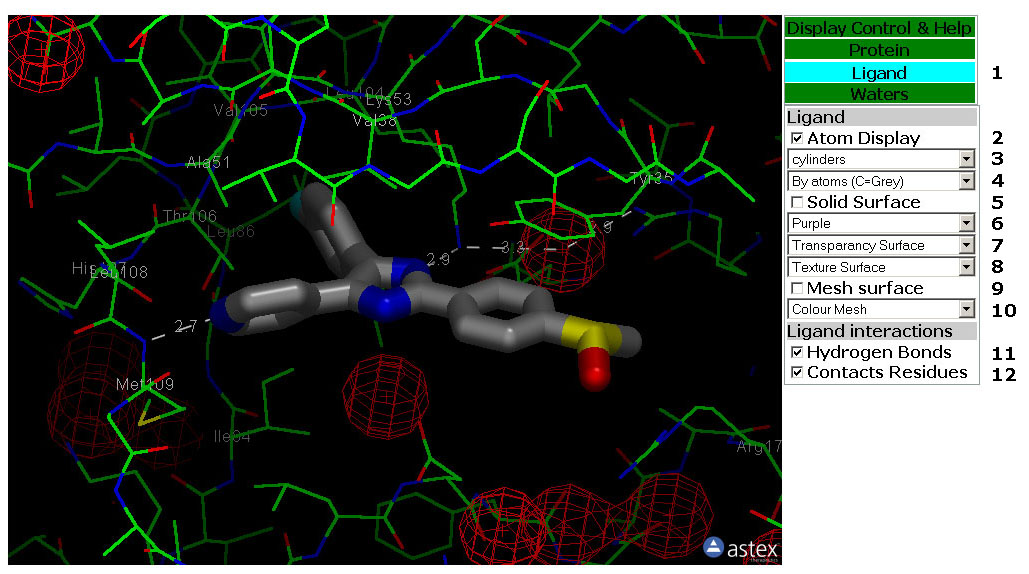
Figure 4: The Ligand Tab. In
this tab you can manipulate the display of the Ligand, Ligand
surface and Ligand/Protein interactions.
4: The Ligand Tab (Figure 4)
Tab Box
4.1: Select the Control Tab by clicking a Tab in this box. The tabs are
Green except for the active tab which is Cyan.
Atom Display
4.2: Toggle the atom display of the Ligand on/off.
4.3: This pull down menu set the Atom Display Style
(Rendering) for the Ligand Atoms.
4.4: This pull down menu colour the Ligand Atoms.
Solid Surface
4.5: Toggle the Solid Surface of the Protein on/off.
4.6: This pull down menu colour the Solid Surface of the Ligand.
4.7: This pull down menu set the transparancy of the Solid Surface of
the Ligand.
4.8: This pull down menu set the texture of the Solid Surface of the
Ligand. The surface is coloured according to lipofilicity.
Mesh Surface
3.8: Toggle the Mesh Surface of the Ligand on/off.
3.9: This pull down menu colour the Mesh Surface of the Ligand.
Display Interactions
3.11: Toggle Hydrogen Bonds from the Ligand to Protein, Cofactor and
Waters on/off.
3.12: Toggle Lables on Protein residues that makes v.d-W contacts to
the Ligand on/off. The alpha carbon of the residue are labled.
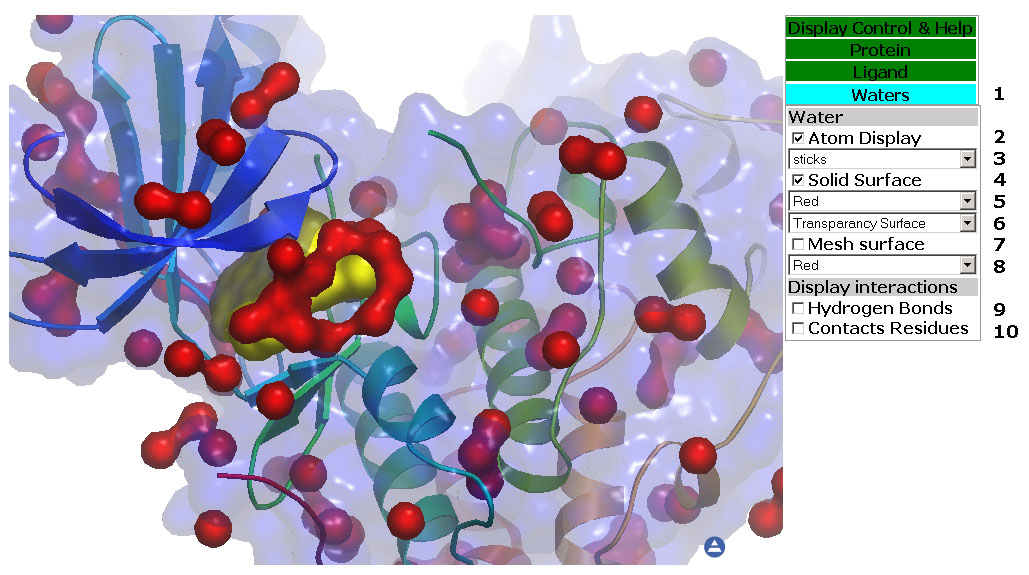
Figure 5: TheWaters Tab. In
this tab you can manipulate the display of Crystal Waters, Crystal
Water
surface and Water/Protein interactions.
5: The Waters Tab (Figure 5)
Tab Box
4.1: Select the Control Tab by clicking a Tab in this box. The tabs are
Green except for the active tab which is Cyan.
Atom Display
4.2: Toggle the atom display of the Crystal Waters on/off.
2.3: This pull down menu set the Atom Display Style
(Rendering) for the Crystal Water Atoms.
Solid Surface
3.4: Toggle the Solid Surface of Crystal Waters on/off.
3.5: This pull down menu colour the Solid Surface of Crystal Waters.
3.6: This pull down menu set the transparancy of the Solid Surface of
Crystal Waters.
Mesh Surface
4.7: Toggle the Mesh Surface of Crystal Waters on/off.
4.8: This pull down menu colour the Mesh Surface of Crystal Waters.
Display Interactions
4.9: Toggle Hydrogen Bonds from Crystal Water to Protein, Ligand and
Cofactor on/off.
4.10: Toggle Lables on Protein residues that makes v.d-W contacts to
Crystal Water on/off. The alpha carbon of the residue are labled.